
Background:
Jefferson Lab's acceleration cavities must be kept extremely cold if they are to operate properly. This is because a property of the Niobium metal the cavities are made from, called resistance, goes away if the temperature is low enough. This activity shows how some physical properties of other materials change if they are heated or cooled.
Objectives:
In this activity students will:
- make predictions of the outcomes of several experiments
- observe the experiments and record their outcomes
- Liquid Nitrogen is dangerous if not handled properly -
DO NOT attempt these demonstrations unless you have been
properly trained in the safe use of Liquid Nitrogen
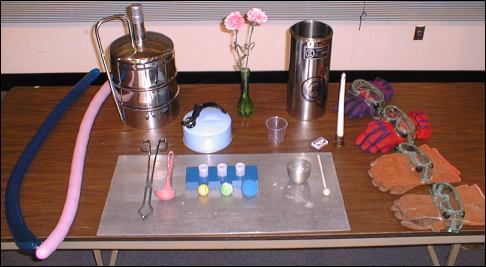
Materials Needed for the "Cold" Demonstrations:
- Several pairs of insulated gloves
- Several pairs of splash-proof goggles
- Assorted ladles and tongs
- 5 liters (~1 gallon) of liquid nitrogen
- A 5 liter, narrow neck Dewar
- A 5 liter, open mouth Dewar flask
- Whistling tea kettle
- 2 long stem carnations
- Matches
- 2 long, skinny, semi-transparent balloons
- An empty 35mm Fuji film container with lid
- Ping-pong ball
- Solid rubber "super ball"
- Racquetball
- Pewter Jefferson cup
Optional Materials:
- Film container holder
- Metal sheet
- Clear plastic cup
- Candle
- Striking rod
Materials for "Cold"
Notes:
- Use of a film container holder is highly recommended. Loose containers will leap into the air and spray any remaining nitrogen in unpredictable directions.
- Fuji film container lids snap into the container, acting like a cork. Kodak film container lids snap around the container and tend to fail at a particular point, allowing the nitrogen gas to escape without blowing the lid completely off.
- A video this activity (Deep Freeze) is available for loan through the Jefferson Lab Science Series Video Library.
Detailed Directions:
1. Pour nitrogen on the floor and table.
results: White clouds of water vapor appear as the nitrogen chills the surrounding air below the dew point.
2. Pour nitrogen in a tea kettle.
set-up: Everyone knows that tea kettles whistle when they are hot. What happens when cold nitrogen is placed in it?
results: The tea kettle whistles is if it is filled with boiling water. Since the room (and tea kettle) are far above the boiling point of nitrogen, the nitrogen rapidly changes to gas, causing the tea kettle to whistle.
side experiments:
- Is the tea kettle actually cold, or hot? Use a dark glove to wipe frost from the surface to the tea kettle.
- Who wants to lick the kettle? Wet a cloth glove and stick it to the tea kettle.
- Watch for liquid dripping from the kettle. This is air condensing onto the kettle. It is a mix of liquid oxygen and liquid nitrogen and should not be collected.
3. Put a flower into the nitrogen (2 volunteers).
set-up: Is it a good idea to put your hand in liquid nitrogen?
results: The water in the flowers freezes allowing the volunteers to crush the petals with their gloved hand.
4. Put a lit match into the nitrogen.
set-up: What happens if a lit match in the nitrogen? This is usually done in the mouth of the open mouth Dewar or in a small cup filled with nitrogen.
results: The match goes out as it passes into the Dewar. The Dewar is full of cold nitrogen gas. Since there is very little oxygen in the Dewar, the match can not remain lit.
common answer: Lots of people will say that it is too cold for the match to burn. Typically, the very top of the Dewar is around 20°F. A bit chilly, but not very cold.
5. Put an inflated balloon into the nitrogen (2 volunteers).
set-up: What happen if I put a balloon in the nitrogen? Lots of people think it will pop.
results: The balloon looks as if it deflated. The air within the balloon has condensed into a liquid and, since nitrogen contracts by about a factor of 1000 when it condenses, it can fit into a smaller volume. The balloon re-expands when taken out and could pop, depending on if some parts of the balloon are pinched off or are fatigued.
common answer: Many people say that the air has left the balloon. If so, there must be a hole for the air to leak out of. Since the balloon re-inflates, it can be shown that there is no hole in the balloon.
6. Put nitrogen into three film canisters and then close the lids.
set-up: I'm going to do the same experiment as the balloons, but in reverse. Instead of trapping air and making it cold, I'm going to trap the liquid and warm it up.
results: The film canisters will sit for a few seconds and then blow their caps off. It will do this with some force, so make certain that no part of you is directly over the canisters. Since the nitrogen expands by a factor of 1000 when it boils, the internal pressure quickly builds to the point where the caps can't stay on.
7. Put a ping-pong ball, a 'super ball', and a racquet ball into the nitrogen (best NOT to let kids do this one).
set-up: Bounce each to see how they act while warm, then place each ball into the nitrogen. You need to wait about a minute before continuing with this experiment. You can start the next demo to make up the time.
results:
- The ping-pong ball is largely unaffected but can be broken if bounced hard enough (try to avoid this). A ping-pong ball is rigid to begin with. Freezing it just made it a little more rigid.
- The super ball is rock hard and acts like a marble. It will bounce normally after it has warmed.
- The racquet ball will shatter when bounced. Throw the ball away from the audience. Kids love to dive for pieces of the ball. You can give them some once they have warmed up enough.
8. Make a lead bell.
set-up: Tap the Jefferson cup (pewter) to make it ring. Fill the cup with nitrogen to see if cooling it improves the quality of sound. The cup needs some time to cool down. You can finish the ball experiment while it cools.
results: The cup rings like a bell. Since pewter contains a lot of lead, it is very soft. Cooling the cup makes the cup more rigid which allows it to ring.
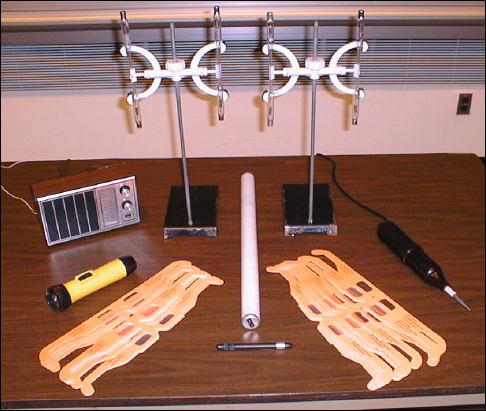
Materials Needed for the "Hot" Demonstrations:
- Hand held Tesla coil
- A class set of diffraction grating glasses (Rainbow glasses)
- Florescent bulb
- Assorted spectral tubes
- Spectral tube holders
Optional Materials:
- Flashlight
- Laser pointer
- AM radio
Materials for "Hot"
Detailed Directions:
1. Turn the classroom lights off and use the Tesla coil to activate the florescent bulb and the spectral tubes. Have the students pay special attention to the colors of the samples.
2. Turn the classroom lights on and give each student a pair of diffraction grating glasses. Observe the classroom lights and explain what the glasses are doing.
3. Turn the classroom lights off and once again use the Tesla coil to activate the florescent bulb and the spectral tubes. Have the students pay special attention to the differences in the samples' spectra.
Notes:
- When operating, the Tesla coil blankets AM radio frequencies with static. This can be observed with any nearby AM radio.
Citation and linking information
For questions about this page, please contact Steve Gagnon.