How to build a double-arm barn door tracker
Sources: Sky & Telescope April 1989 (p436 - p441) [very good]
Sky & Telescope February 1988 (p213 - p214)
Original concept by Dave Trott
A single-arm barn door tracker, driven by a straight screw, accumulates tangent error as time passes. Most of this error can be eliminated by adding a second hinged arm to the standard arrangement. There are four types of double-arm trackers, each with a different geometry. A comparison of accumulated error (in arc seconds) and construction parameters is given below:
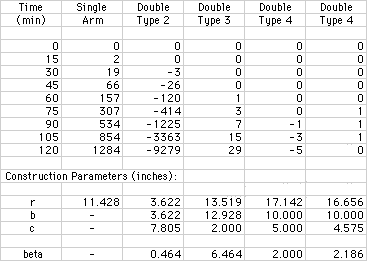
[Apparently Type 1 is very bad and not worth constructing?? The two Type 4 drives vary in beta. This results in shifting the region of maximum error over the course of two hours of tracking. Beta, the ratio of b/c, is unitless and must be preserved if you use different dimensions.]
Basic Anatomy
Double-arm drives have three main platforms: the base board, the drive arm, and the camera platform.
The base board is the bottom board and hopefully doesn't move around during the course of the exposure.
Both ends of the drive arm are connected to the base board. One end is connected to the base board with a hinge that allows the drive arm to swing shut. The other end is connected to the base board by means of a threaded rod (the drive screw). The rate at which the drive arm closes is determined by the rate at which the drive screw spins.
The camera platform is also hinged to the base board on one end. The other end of the camera platform slides along the drive arm. The camera platform closes with and slides along the drive arm.
The hinges for the drive arm and camera platform are parallel to each other.
The drive arm, base board and drive screw form an isosceles triangle whose base angles change as the drive arm moves. Whatever arrangement is made to mate the drive rod to the base board should allow the drive screw to pivot as the drive arm swings closed. The diagrams in Sky & Telescope also show the drive motor attached to the end of the drive arm on its own hinged extension to prevent binding.
The drive screw must travel at three inches per hour for the above measurements to be valid. A quarter-twenty rod driven at one revolution per minute will work.
Parameter Definitions
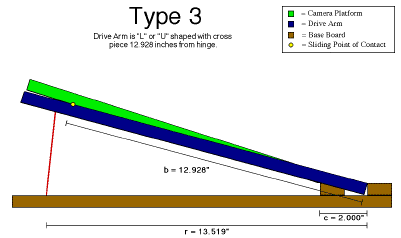
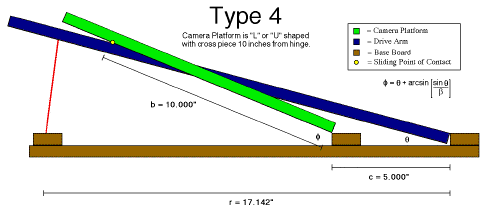
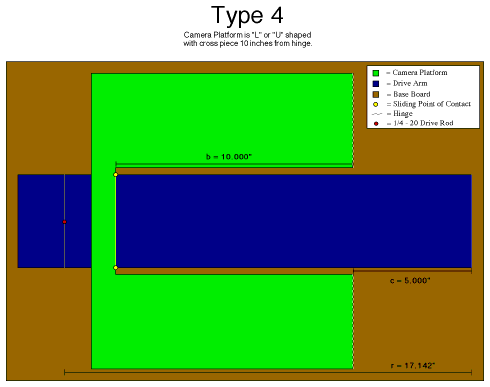
r = the distance from the drive arm hinge point to the drive screw (measured along the base board).
b = the distance to the sliding contact point between the drive arm and camera platform. The hinge you measure from depends on the drive geometry since this distance must not vary as the arms close. For a Type 1 and Type 4 drive, b is measured from the camera platform hinge point to the sliding contact point. For a Type 2 and Type 3 drive, b is measured from the drive arm hinge point to the sliding contact point.
c = the distance between the drive arm hinge and the camera platform hinge (measured along the base board).
beta = b/c
Diagrams
An artist I am not. I have done the best I could...
Type 3 Drive (click to get an almost-to-scale drawing)
Type 4 Drive, Elevation View (click to get an almost-to-scale drawing)
Type 4 Drive, Plan View (click to get an almost-to-scale drawing)
In Conclusion...
I hope this helps. I will add the drawing for the Type 2 drive if enough people ask, although I rather doubt it due to its poor performance. Other suggestions for this page are welcomed! Comments about and photographs of a Type 4 drive that I have built are available for your viewing pleasure.
Clear skies!
Citation and linking information
For questions about this page, please contact Carol McKisson.