
Background:
Electromagnets are a part of our everyday lives. They are useful because they act like magnets when the current is on and lose their magnetism when the current is off. Some electromagnets we use everyday are in school bells, telephones, automatic doors and tape recorders. Scientists at Jefferson Lab use electromagnets to focus and steer the electron beam around the accelerator and to help guide and measure the charged particles resulting from their experiments.
Objectives:
In this activity students will:
- work in teams
- build an electromagnet with 25 turns of wire
- test the 25-turn electromagnet's strength at 4 different voltages by using it to pick up paperclips
- build an electromagnet with 50 turns of wire
- test the 50-turn electromagnet's strength at 4 different voltages by using it to pick up paperclips
- record data
- use addition and division to calculate the average number of paperclips each electromagnet lifted at each voltage
- create a line graph to depict each electromagnet's strength
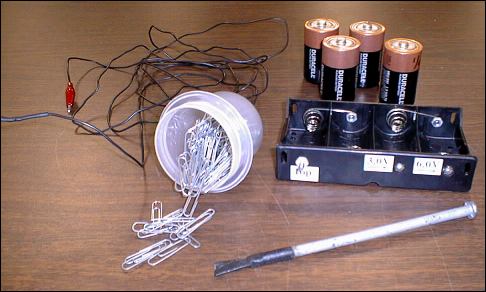
Minimum Materials Needed for Each Student Group:
- A large iron nail ~16 centimeters (~6 inches) long
- 3 meters (~10 feet) of No. 22 insulated, stranded copper wire
- Four 1.5 volt batteries (D cells)
- A battery holder to hold the four batteries
- 100 metal paper clips
- A small container to hold the paper clips
Optional Materials:
- Alligator clips
- A soldering iron and solder
- Small screws and nuts
- Voltage labels
- Thick, strong tape
Materials for Magnets and Electromagnets
Pre-Activity Preparations:
The Wire
1. Strip a few centimeters of insulation off of each end of the wire.
2. Attach an alligator clip to one end of the wire.
3. Bend the exposed wire on the remaining end of the wire into a "U" shape. Twist the wire together and apply some solder to keep the wire from unraveling.
The Battery Holder
We modified our battery holder to make it easier to apply different voltages. If your battery holder is of a different type, these modifications may not be possible.
1. Remove all wires that came attached to the battery holder.
2. There is a hole at the positive end of the battery holder. Take a small screw and place it through this hole so that the screw's head is inside the battery pack. Secure the screw in place with a nut. Make certain that the nut does not completely cover the screw since the alligator clip will be attached here.
3. There are other holes in the battery pack that correspond to the negative terminals of each battery. Place small screws in each of these holes so that the screw's heads are on the outside the battery pack. Secure the screws in place with nuts. The screws should be as short as possible so that they don't unnecessarily interfere with the placement of the batteries.
4. Label the screws so that the students will be able to tell what voltage the electromagnet is using.
The Nail
1. Wrap some tape around the point of the nail to prevent the students from making creative designs on the table tops.
Citation and linking information
For questions about this page, please contact Steve Gagnon.