Jefferson Lab's Workbench Projects
Assembly
- Remove the bottom base board from the base.
- The diameter of the large hole that was drilled through the top base board is too large to hold the PVC pipe firmly. Line the inside of this hole with the strip of adhesive felt to help improve the fit.
- Feed the coil's lead wires through the small hole in the top base board and fit the PVC pipe through the large hole. Flip the base over so that you can access its interior.
- Install the power switch.
- Feed the power cord through its hole in the back of the base. You may wish to knot the power cord in order to prevent it from being accidentally pulled out of the base.
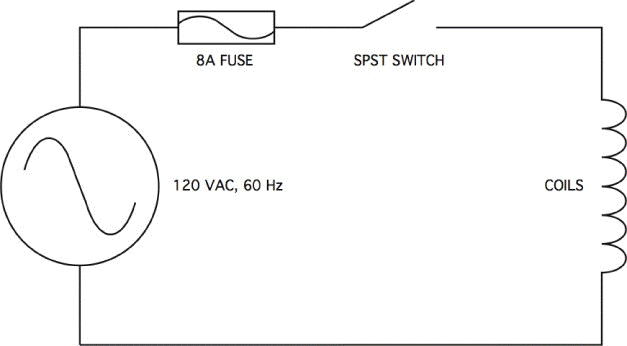
The circuit for this device is very simple as the coil is essentially connected directly to the household power supply. The circuit provides a switch to conveniently turn the device on and off and a fuse to guard against accidental overloading. Once again, this device should never be used if the iron core has been removed from the coil. The circuit starts at the hot side of the AC power line, passes through the fuse, then through the switch, then through the coil and ends at the neutral side of the AC power line:
If your power cord follows the standard color coding scheme, the black wire is the hot lead, the white wire is the neutral lead and the green wire is ground. If your cord is coded differently, you can use a multimeter to identify which leads are which. If you are looking directly at a standard three prong plug, the upper left blade is hot, the upper right blade is neutral and the lower blade is ground. Set your multimeter to measure resistance and, with the cord unplugged from the wall, attach one end of the multimeter to one of the blades and touch the other end of the multimeter to each of the cord's leads in turn. When you find the lead that makes the resistance drop to zero (or nearly zero), you have found the lead that corresponds to that blade. You can identify all of the leads in this fashion.
- Cut a 3/4" length of 3/16" heat shrink and slip it onto the power cord's hot lead. Use a wire stripper to expose about 1/2" of the hot lead's copper wiring.
- Use a wire stripper to expose about 1/2" of one of the fuse holder's lead's copper wiring.
- Join and solder the hot lead to the fuse holder's lead. Make certain that the heat shrink is far enough away so that the heat from the soldering operation doesn't accidentally shrink it.
- Once the joint has cooled, slip the heat shrink over the exposed wire and shrink it with a heat gun.
- Follow the same general procedure to solder the other end of the fuse holder to one of the power switch's terminals.
- Obtain a 6" length of 18 gauge hook-up wire and use a wire stripper to expose about 1/2" of copper wiring from each end. Solder and heat shrink one end of this wire to the power switch's other terminal.
- Use a wire stripper to expose about 1/2" of copper wiring from both of the coil's leads. You may need to undo some of the braiding in order to get reasonable lengths of wire with which to work.
- Take the free end of the wire that you attached to the power switch in step 11 and place it beside one of the coil's leads. Hold the wires so that their exposed ends are even with and parallel to each other. Place a wire nut over the exposed ends and twist it to join the wires.
- In a similar fashion, use a wire nut to join the coil's other lead to the power cord's neutral lead.
- The power cord's ground lead is not used in this device. To prevent it from accidentally shorting part of the circuit to ground, fold the ground lead back upon itself and cover it completely with heat shrink.
- Place the 8 amp, fast acting fuse in the fuse holder.
- Since the large hole on the bottom base board is too large to securely hold the PVC pipe, reduce the hole's diameter by taping small strips of duct tape around it in a starburst pattern. A strip of duct tape can also be wrapped around the end of the PVC pipe in order to increase its diameter.
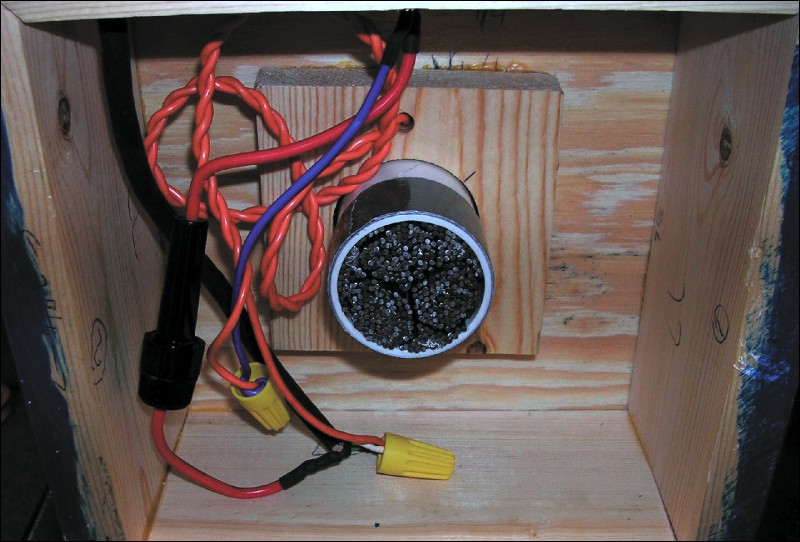
The wiring is complete. The switch is located at the top of the photo. Duct tape has been wrapped around the PVC pipe in order to secure it to the hole in the bottom base board. This particular device has already had its iron core installed.
- Install the bottom base board, making certain that the PVC pipe is fully seated. Secure the bottom base board to the rest of the base with the four #6 wood screws.
- Attach the four adhesive felt feet to the bottom of the base and set the device upright.
- Insert the three bundled sets of steel rods into the PVC pipe. Use the remaining 100 steel rods to fill in the gaps between the bundled sets. It may take some doing, but you should be able to fit all of the iron rods into the PVC pipe.
- Once the core is in place, take a step back and marvel at your greatness, for you are done.
Citation and linking information
For questions about this page, please contact Education Web Administrator.